Wednesday, June 11, 2014

Has It Been Three Months???

Wow! I know I've been lazy about posting to the blog. I'm sorry. And, until I opened the program to provide an update I didn't realize it had been three months since I last posted. 2014 has been a much slower year for changes to 3283 than 2013 was -- though there will never be a year like last.

We have made some progress here over the last few months....and have made some decisions for some significant work to be done over the next few weeks or so.  I won't go indo the usual level of boring detail that I have in the past. But, I will explain the work done recently in highlight and photo form.

As you entered 3283 one of the first things you saw was a 'vintage' 1960's globe shaped ceiling light. I have never liked it, and it was certainly not right for our upgrades.  We selected a new fixture and replaced the old one a few weeks ago.

Out with the old.....
...in with the new.
The back entry 'deck' was built early last year. It functioned through the summer, fall and winter in its raw pressure treated lumber form. Once the weather warmed [some] this spring Bobbie and I finely spent a weekend painting it. A professional painter suggested that for treated lumber we use a solid color stain rather than traditional paint. So, we tried that. Two coats. It's a matte finish rather than the semi-gloss of the siding. We'll have to see how it works over time.


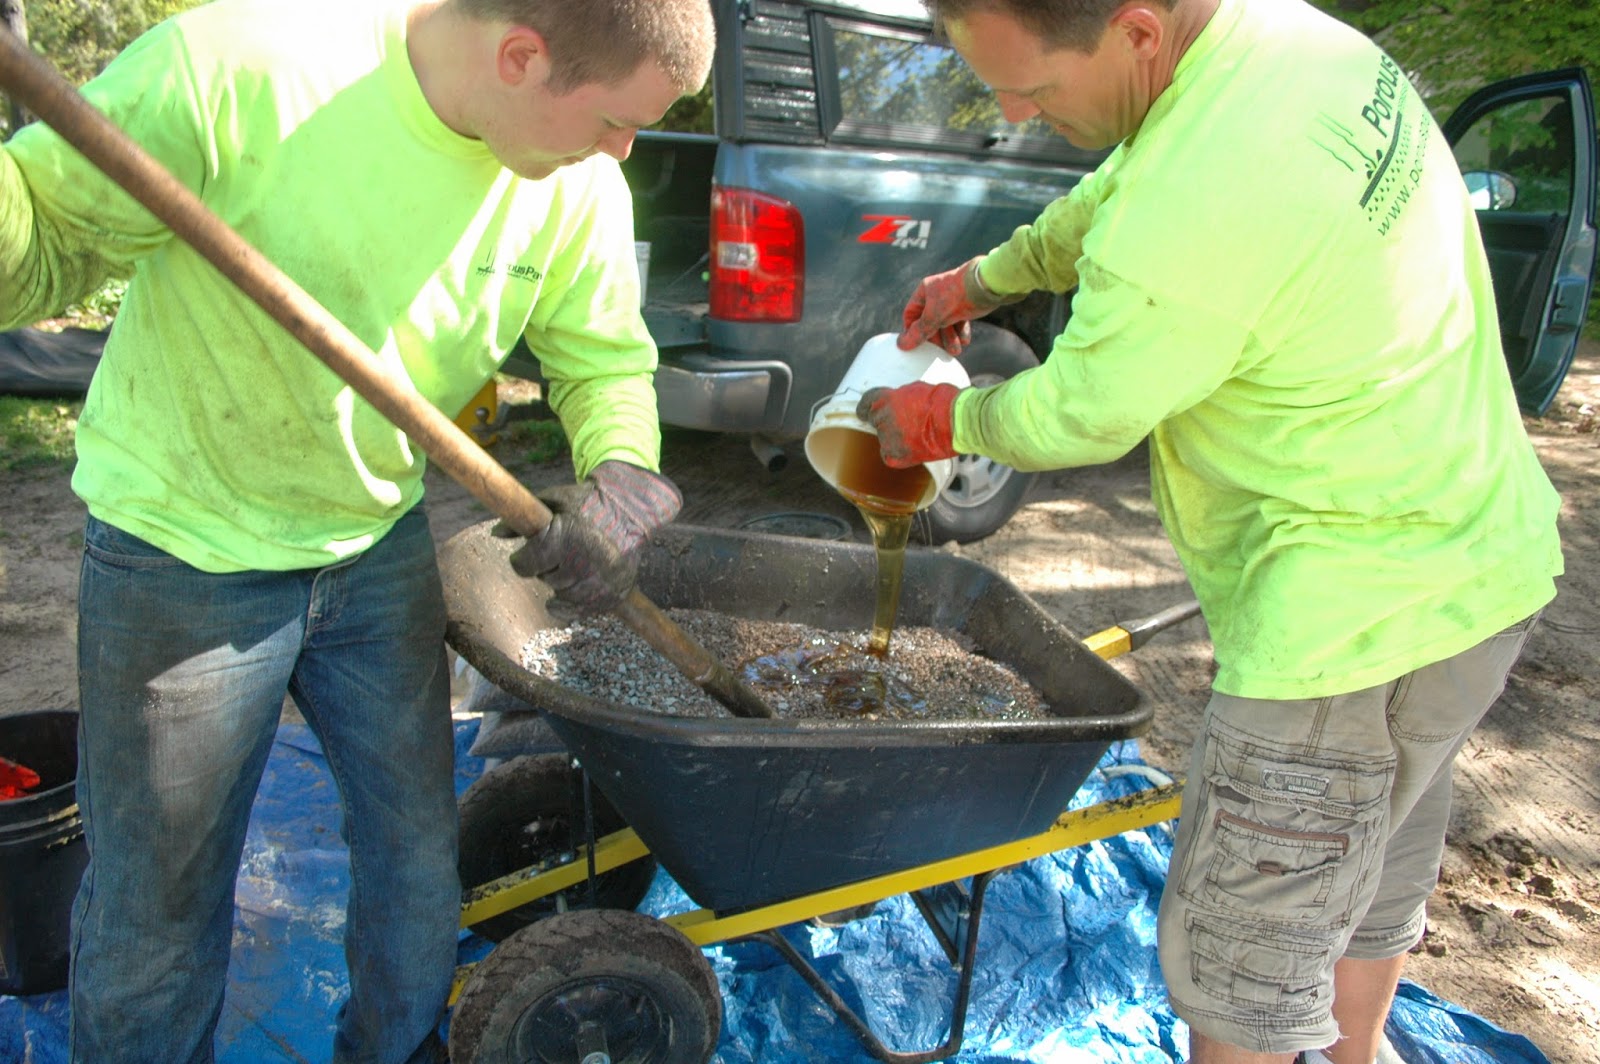
The outside steps to the basement door were also built last spring as part of the retaining wall that protects the slope down to the basement door. But the treads of the steps were never finished. They remained simply a sand surface. While this was great for allowing rain to soak in it was not very good for walking or carting heavy stuff into the basement.

I considered a number of options to provide a firm surface on each step but yet allow rainfall to infiltrate. I finely selected a product called PorousPave. Its made from recycled rubber [tires] stone and a proprietary polymer that holds it all together. It sets up as hard as asphalt...but allows water to flow right through it.  The contractor spent about a half day at 3283 preparing each step and installing the PorousPave. Below are a few pictures of the work and the finished product.


Over Memorial Day weekend Sue, Damon, Drew and Leo came from Minnesota to enjoy 3283 with us. It was mostly family time and relaxation. But, Bobbie did ask Damon to help me install a new flagpole next to the stairs to the beach. He did all the hard work.....I tried to keep things plumb. 


Mike, Lindsay and JJ were also able to spend time here over part of the holiday weekend, though Mike had to work much of the time. Having our grandsons here makes everything worthwhile.

Drew, Leo and JJ
3283 has a fireplace. Well, it had a fireplace. My grandfather made a fire in it just about every night that I can remember as a kid. But the chimney is unlined brick with less-than-perfect mortar in places. It is structurally sound but it has not been safe for a wood fire for a long time. We decided that a gas insert would make the fireplace functional and provide some heat.

We had some trouble finding an insert that would fit within the small opening.....but were eventually successful. Last week the contractor came and installed the insert and the metal piping that runs up inside the chimney. It's not quite functional yet. The end piece for the piping needs to be installed on top of the chimney yet. When that is done we will again be able to have a fire in the living room of 3283.  Installation pictures below.

Connecting the gas line in the basement.
The gas [and electric for the fan] come up in the room behind
the fireplace. This spot will soon be inside a closet.
A remote control unit was installed to replace the basic manual one.
The gas line is attached to the insert.
Combustion air intake and exhaust piping has been
run down the chimney and attached to the insert.
The "finished" fireplace insert.
Besides the work shown above we did more painting/staining of trim in the addition. Bedroom windows are complete. Bathroom windows and 80% of baseboard has been stained and awaits urethane and installation. Bobbie did a wonderful job staining and probably painted 70% of the bedroom trim. Thanx!!!!

Finely, we spent a lot of time thinking about, researching, and talking to professionals about the floors throughout the main portions of the first floor. We will be finalizing a contract with a flooring company to completely replace floors in the entry/kitchen, living room and main bathroom. They will also be installing a new floor on the front porch which was reconstructed as part of last spring's work. And. you may have noticed that the fireplace insert is raised above the floor within the old opening. The flooring contractor will be building a new raised hearth. We've picked the material but have not yet finalized the size.

We hope that the floors will be complete within the next month. Stay tuned. I promise to provide daily updates as that work proceeds.

Well, i just spent a good part of a rainy morning typing and posting pictures. I wonder if all my followers have given up on me and if anyone will see this. Please leave a comment or send me a note ... I'd like to know who may still be interested.

And.....
Be Happy. Have Fun.


Friday, March 14, 2014

Progress -- Underfoot

Winter at 3283 has been a dormant period. Snow, cold and my desire to do more hibernating than working greatly reduced my productivity.  The snow is still here. The temperature is certainly not quite springlike. But the days are longer and there have been periods of temperatures above freezing. And I guess, like the groundhog did a few weeks ago,  I've come out of my burrow and made some progress on the place.

We had purchased laminate flooring that was to  be used on the front porch floor. Faithful followers saw pictures of the boxes and boxes of it last summer. But...luckily...I procrastinated with the installation. We knew the porch got damp. With the heavy winds and rain this fall it became obvious that the windows need major re-glazing to keep the floor dry. Significant amounts of water found its way onto the porch floor during these storms. Had a "floating floor" been installed the moisture would have gotten below the flooring and created a perfect location for mold growth.  We decided to use the flooring in the addition instead.

Over the past few days I worked on installing the floor in the new bedroom. The product is Shaw VersaLock laminate. It has a unique method of locking planks together -- both side to side and end to end. This makes for a very tightly interlocked floor. But the installation turned to be more complex and not simple for one person to complete alone.  It took me good parts of two days and a couple hours  on a third day to complete a floor about 16 by 12 feet in size.

I took a few pictures at various stages of the project. They are below.

Here's the room before installation.
The first task was to put down a foam/plastic underlayment.
Instructions called for this to be run up the walls a couple inches.
This shows the north wall with the first strip of underlayment
in place and some of the flooring laid down to check lengths.
The VersaLock system requires that each plank be held up at about a
30 degree angle along the total length before it is snapped into place.
Two heat register openings along the west wall required that both the
underlayment and the flooring be cut so the register covers could be installed.
Here's the first three rows of flooring and the beginning of the fifth row.
Rows were installed from north to south and from west to east.
Often a row didn't properly snap tight. I then had to disconnect the planks
and start over from the west. This is where a second pair of hands would have helped.
Here the flooring has reached the second heat opening.
It's beginning to look like a finished floor. 
Along the south wall the underlayment needed to be cut roughly in half lengthwise.
Special effort was needed where the flooring came up to the two doors in the room. The bathroon floor had been installed with a tile threshold where the pocket door will be installed. The ends of the flooring will be covered with a molding butted to the threshold...and a bead of caulk will be run along the molding to seal it from any moisture that may find its way out of the bath. I installed the floor through the entry door. A similar molding will transition it to the existing floor in the laundry/hall.

This is where the floor will abut the bath threshold.
The molding is laying [upside down] on the bathroom floor.
This shows the underlayment through the entry door opening.
There was one section if the flooring near the doors that couldn't be snapped together normally. This was anticipated by the Shaw instructions. They called for a locking ridge to be planed off of one of the planks and a bead of glue placed to connect the planks. Tape was to be used to hold the planks together while the glue dried.
 
Here is the floor at the southeast corner of the room. Both moldings can be seen.
And, the tape is holding the glued planks together.
It's not easy to take pictures of a room's floor and get all of it within the frame of the picture. But to try and give an overview of the finished product I took a few shots. They are below. All that needs to be done now is install the baseboard that will keep the edges of the floor in place. The north and west walls will be easy. But finishing the baseboard on the east and south walls won't be done until doors and door finish molding is complete.


Monday, February 17, 2014

Final Plumbing and Electrical Approvals

Just a quick update today.

3283 was visited today by Gordon Bosch and Gary Raak Park Township Electrical and Plumbing Inspectors. Both signed off on final inspection of work done. Should be able to request final building approval soon. Mechanical was approved this past summer (they didn't use the general form). 

Below is the electrical and plumbing sign off form.


Sunday, February 16, 2014

Ice Dams

Or probably more appropriately:
Damn Ice!!!

The back [east] porch at 3283 isn't heated. But we wrapped it in plastic last fall. This seems to have trapped some heat in it. Heat that escaped from the house or was generated through solar heating. The heat was enough to melt snow on the un-insulated roof and create a major ice dam at the edge. Behind the dam a lot...I mean a LOT... of snow built up.

There is a brand new roof on the porch....and we had heavy duty "ice guard" installed under the shingles, so I'm not too concerned about leaks. And any leak would only be onto the porch. But, they are predicting a thaw this week...and even rain in a few days. So I decided to try to remove as much of the snow as I could today. No, I didn't climb out on the roof. I used a roof-rake to push the snow off [from the upstairs bedroom windows]. It wasn't fun. It wasn't easy. It showed just how much ice is up there.

The pictures below aren't very exciting. But since I haven't posted in a while they, at least, prove that life goes on here at 3283.

The largest drift was at the south end of the porch.
You may be able to see the thickness of the ice along the edge of the roof.
Here's a close-up of that large drift.
See the 'wedge' of ice at the right.
There was no way to reach the snow from below....even with a roof rake. So I attacked the cold white enemy from above. I opened the bedroom windows and pushed the snow off as best I could.

Pushing snow with a tool made for pulling. Oh, well.
Another shot of the tool and the snow.
The first effort was at the south end where snow was deepest.
All the snow pushed from the roof, obviously, ended up on the deck
and needed to be moved again.
This time the tool is out the north window.
I often pulled some snow toward me to loosen it...then pushed it off the edge.
On the north side I was able to clear some snow down to shingles.
South side...basically done.
North side...basically done.
Here's the east side of 3283 with much snow removed from the porch roof.
I'll let you all know how it handles the thaw and rain this week.


Monday, February 3, 2014

Quick Update

Not a lot of progress has been made lately at 3283. Mostly I've been watching it snow, moving snow out of my way and learning about winter in west Michigan. I'm told that this is far from a normal winter....so maybe Mother Nature decided to give me a "baptism of fire".... or, more correctly of snow and ice.

One lingering task that did get completed [80%] was the covering of the heating duct in the living room that had to be run up to the second floor.  We decided to use some of the old paneling to 'box out' the corner. I installed the panels recently. I will eventually cover the top portion with 1x8 to mimic the 2x8 floor joists. And an outside corner molding needs to be installed, but we'll try to stain it to match the paneling, first.

Before paneling. Just studs around duct.
After paneling. Baseboard and top trim to come later.

One of the winter discoveries I made over the last few weeks concerned high winds, drifting snow and high efficiency furnaces. Most of us now-a-days have furnaces that no longer use house-air for combustion and vent out through a chimney. We have 'modern' high efficiency furnaces whose combustion air and exhaust travel through PVC pipe installed through openings at the side of our homes. These usually are seen as two 3 inch white pipes one of which that has smoke [steam] coming out when the furnace is running.

Often the pipes are not very pretty. So, last summer when my heating contractor installed the intake/exhaust for my system I was pleased by its appearance. It was a simple plastic plate almost flush with the siding at the level of the sill plate. A picture, taken this summer, is below.

The original Intake / Exhaust fitting.
Aesthetically pleasing for this sort of thing.
There is an endless debate as to the appropriate order of form and function. In this case the contractor chose form first and the installation functioned wonderfully. That is, it functioned wonderfully until the snows of winter blew in from the west and created a large drift. The drift covered the fitting, starving the furnace of combustion air and blocking the exhaust. The technology knew exactly what to do when that happened....it simply shut down the furnace.

It seems that the worst drift in this location is when heavy snow is blown in from the SSW. And we had that condition for a few days in a row recently. In order to assure warmth inside I continually went out and cleared the snow and attempted to build a "shield" to minimize the drifting. But during the worst of the period, I was clearing the snow every 4 hours or so. Needless to say I had a couple nights of sporadic sleep, at best.

My heating contractor stepped up and [hopefully] remedied the situation by installing the "goose neck" type piping that I had originally anticipated. In this case function will take precedence over form. And I expect that the pipe openings are high enough to handle even the worst drifts.

The 'old' cover plate was removed.
Vertical extensions were attached.
And, elbows were attached at the top.
These should be high enough to stay out of snowdrifts.
They will get painted in spring.

There will be another week or so of minimal effort at 3283. But as I progress I will continue to post updates. I hope all my readers are enjoying the winter of 2013-14; staying warm; having fun and being happy.